
1. For better grip, flip the bobby pin over so the wavy side is against your head.
If you have a hard time keeping your bobby pins in place, try flipping the pin over. The straight side is slicker and won't grip as well as the wavy, more textured side.

2. Insert bobby pins into your ponytail holder vertically to prop up your ponytail.
Once you've put your hair in a ponytail, insert two or three bobby pins halfway inside the elastic and facing downward toward the crown of your head. Then, fluff your ponytail and flip it over for a fuller look that won't sag or droop.

3. Texturize milkmaid braids with a teasing brush or toothbrush.
French maid braids look best when they're roughed up a little to achieve that lived-in look. To get that effect instantly, take a teasing brush or a toothbrush, and texturize the braids by brushing them against the way they've been braided.

4. Twist your hair, and slip your bobby pin underneath to discreetly pin back your strands.
If you're looking for a way to pull back the sides of your hair but don't want the pins to show, try this simple technique: Insert a bobby pin with the open end pointing toward your face and in the opposite direction of the section you're pinning back. If one bobby pin isn't strong enough, try using a larger one or reinforce it with a second pin right below.

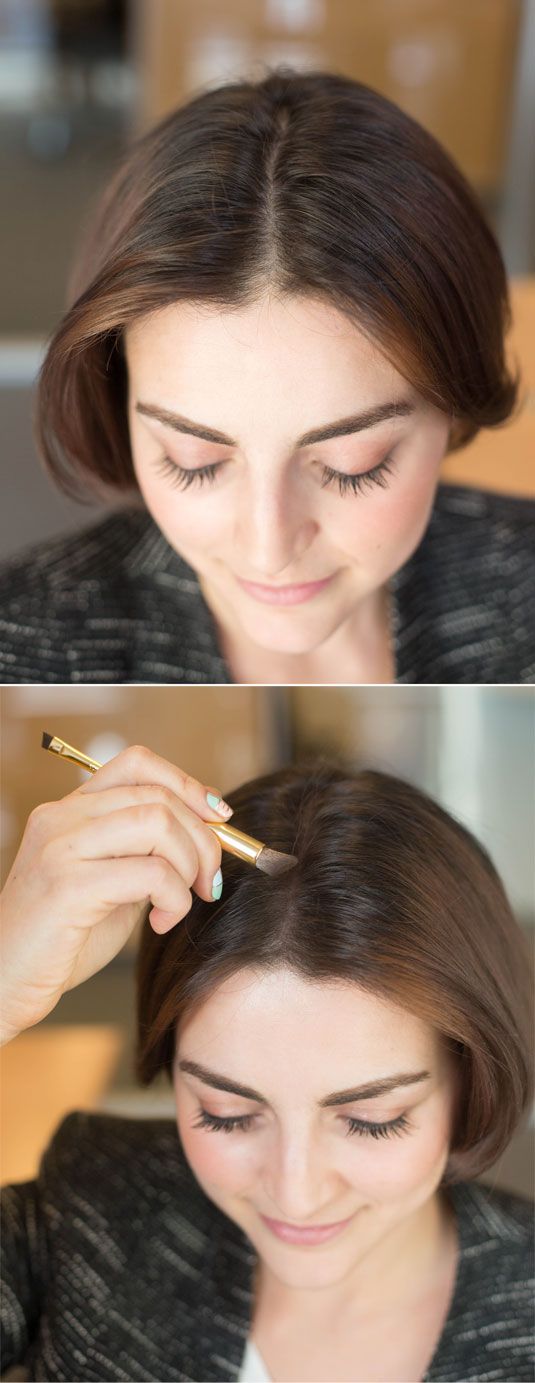
5. Dust an eyeshadow (in the same color family as your hair) along your part to shade your scalp slightly, making your hair appear thicker.
Not only will this trick work IRL, but in pictures your hair will appear super-thick. You can also use this hack along your hairline if you wear it in a ponytail a lot or simply don't like to part your hair to get the same results.
6. Make your nail polish dry faster by soaking your nails in ice water after painting them.
Fill a bowl with ice and water, and soak your nails for a few minutes after painting them. The cold water will set the paint and help your nails dry faster.

Fill a bowl with ice and water, and soak your nails for a few minutes after painting them. The cold water will set the paint and help your nails dry faster.
7. The most flattering way to apply concealer is to draw a triangle with the base under your eye and the point toward your cheek.
This shape not only conceals dark circles, but it also instantly creates the illusion that your face is lifted. Think of it as holding a flashlight against your cheek, shining the light right underneath your eye, and drawing the focus upward.
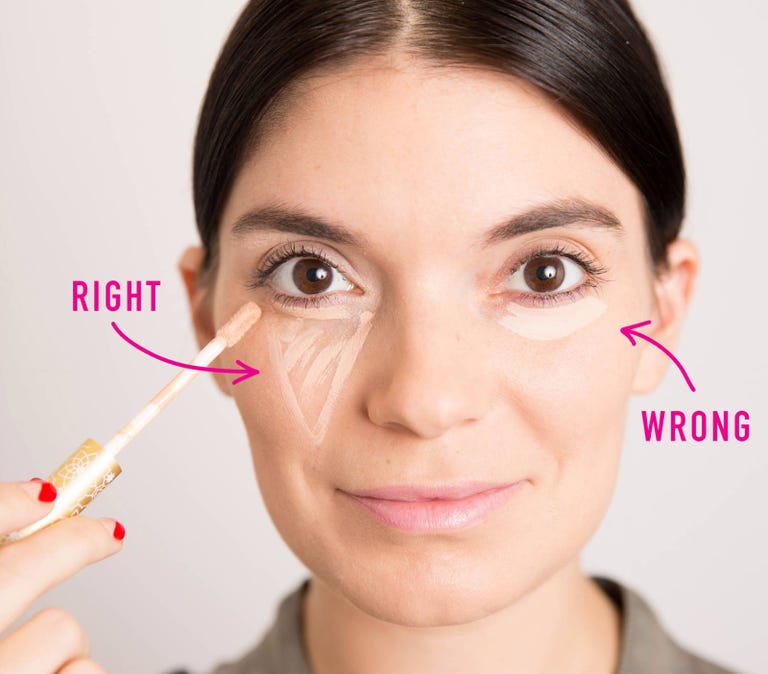
Product in this look: Pacifica Natural Minerals Transcendent Concentrated Correcting Concealer in "Natural"
8. Use a concealer that's slightly lighter than your skin tone to line three tiny sections of your eyes: the inner "V," the middle section of your eyelid, and just below your brow bone.
Lightly blend for instantly well-rested eyes and a highlight that looks natural. Great for days when you didn't get enough sleep (or are just hungover).
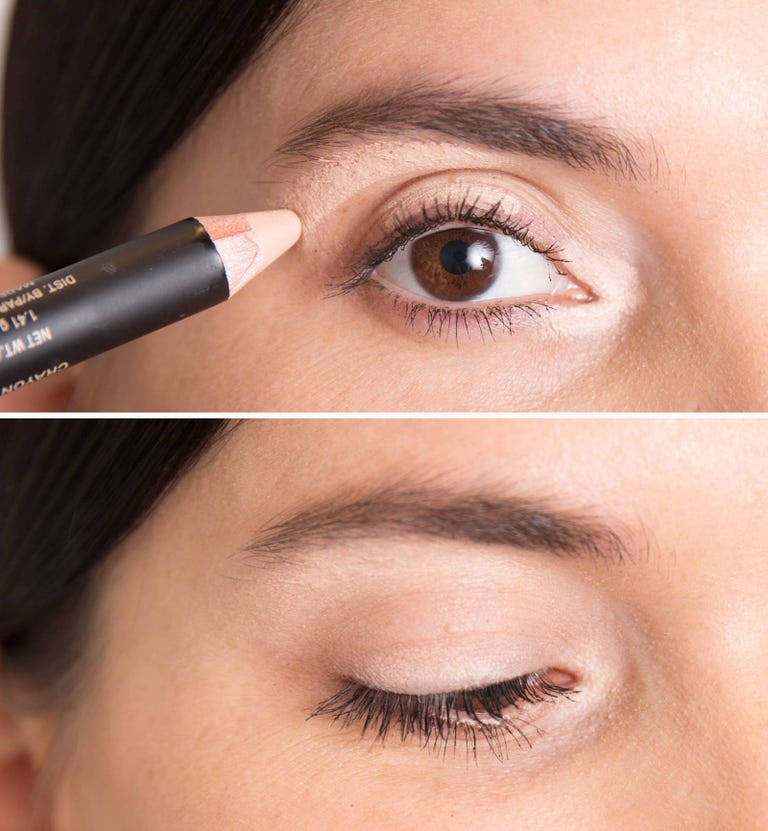
Product in this look: Nudestix Concealer Pencil Crayon Correcteur in "Light 2"
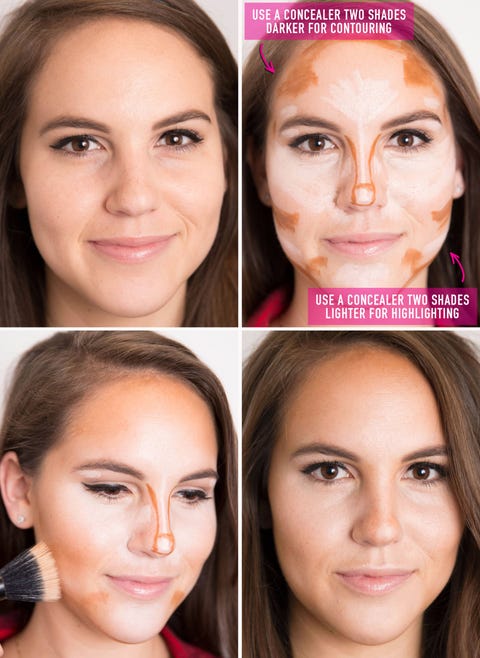
9. Amp up your going-out makeup by contouring and highlighting your facial features with two concealers: one two shades darker than your skin tone and one two shades lighter.
If you're using pencil concealers, you have more control of the placement, which makes contouring easy. Just draw the lighter shade of concealer on the areas that naturally catch light, and use a darker one to shade in the areas that are naturally shaded. Then, blend with a buffing brush like this one from Tarte Cosmetics.
10. Fix foundation stains with a little bit of shaving cream.
If you take off your shirt and accidentally smudge your makeup on the collar, just wipe a dollop of shaving cream on the spot to pretreat it before tossing it in the wash.
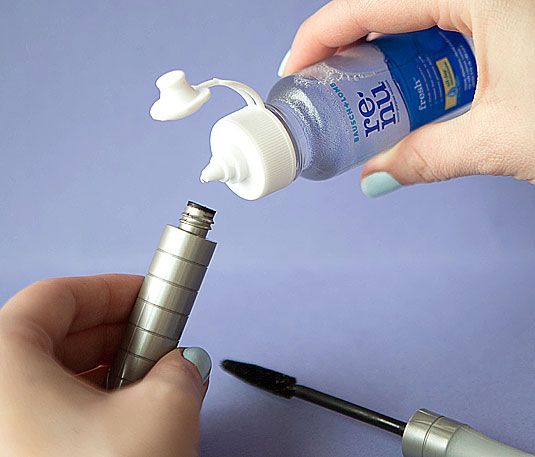
11. Add saline solution to a flaky mascara formula to re-wet it.
You're only supposed to keep mascara for three months, because beyond that point, it can collect bacteria and lead to eye infections. However, if your mascara dries up within three months, revive it with a couple drops of saline solution.
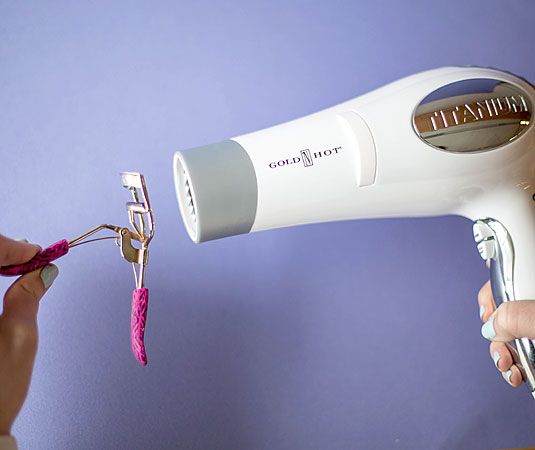
12. Hit your eyelash curler with a hair dryer to heat it up, so your lashes curl easier.
Blowing hot air on your eyelash curler will help your lashes curl easier and stay curled longer. It works the same way as when your hair holds a curl with a curling iron; heat changes the pattern of your hair. To do it, hit the lash curler with your blow dryer until it heats up, wait until it cools slightly but is still warm (you want to be sure not to burn your eyelid), and then clamp down on your lashes to curl them.
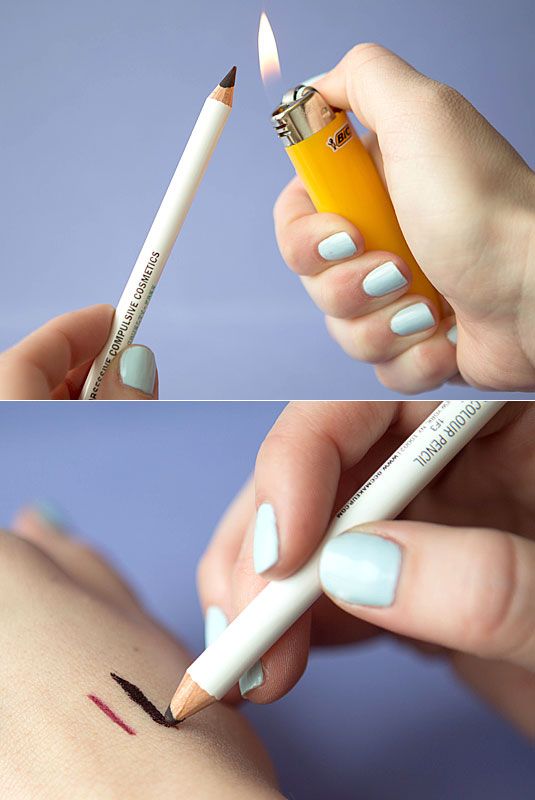
13. Turn a pencil eyeliner into a gel formula with the help of a match or lighter.
Hold your black, green, burgundy, etc., kohl eye pencil (which typically creates a thin, harder-to-apply line), under the flame for one second, let it cool for 15 seconds, and then watch the consistency change right before your eyes. Glide on your newly made gel liner for an instantly smudgier formula.
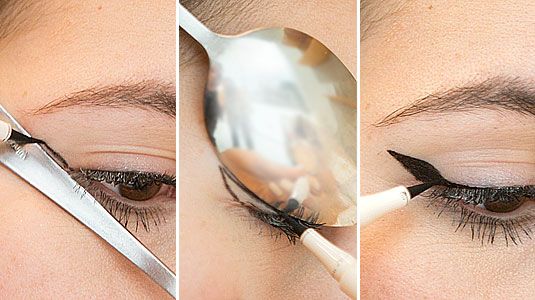
14. Use the handle and the rounded edge of a spoon to create the perfect winged liner.
Hold the handle of a spoon against the outer corner of your eye, and draw a straight line. Then, flip the spoon so it's hugging your eyelid, and use the rounded outer edge to create a perfectly curved, winged tip. After you've made your outline, fill it in, and draw a line across your lashline to finish the look.
15. Dust baby powder over your eyelashes between the first and second coats of mascara to plump up your lashes.
Translucent powder or baby powder has grip, so it will stick to your lashes in between each coat of mascara, making your lashes appear more voluminous. Try this tip using this tutorial.

16. Get the perfect smoky eye by drawing a hashtag on the outer corner of your eyelid and smudging it out with the sponge.
Keep drawing hashtags and smudging it out to get a darker, smokier look.

17. Use clear tape as a no-fail cat-eye guide.
Place the edge of the tape in line with your bottom lash line and angle the top toward the end of your eyebrow.

18. Use cold green tea bags to decrease puffiness under your eyes.
The quickest way to de-puffing and tightening your under-eye skin is to apply a cold, caffeine-based product, like two cold green-tea bags, under your eyes for five or six minutes.

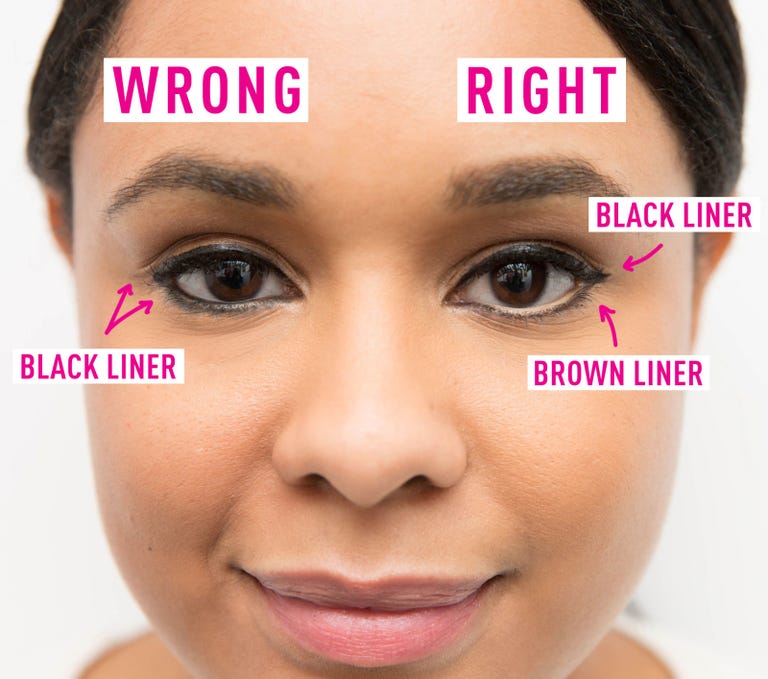
19. Don't apply black liner all around your eye and in your waterline. This will make your eyes appear much smaller than they are.
Instead, line the top with black liner, the bottom with brown liner, and the waterline with nude liner to really open your eyes.
20. Make a less pigmented eye shadow more vibrant by covering your eyelid with a white eyeliner first.
This will help cancel out the color of your skin, creating an neutral base for the shadow and making the color pop

21. Use white eyeliner as a brow highlighter for an instant eye lift.
Line below and above your eyebrows with a thick white liner, and smudge it out with a sponge brush to define your brows.

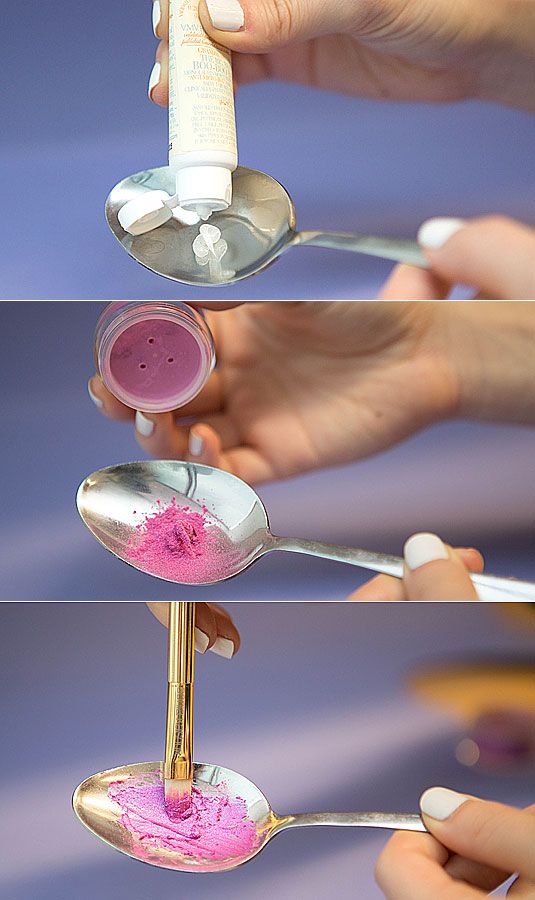
22. Mix loose pigments with a salve to make your own custom lip color.
Grab one of your favorite eyeshadow pigments, and blend it with a little bit of a salve, such as VMV Hypoallergenics Boo-Boo Balm, or petroleum jelly in a spoon. Use a finger or a brush to apply your new custom lip color.
23. Create the illusion of plumper lips by filling in the middle section with a light concealer, blending it out with the warmth from your fingertip, and finishing with a nude lip gloss

Product in this look: Nudestix Concealer Pencil Crayon Correcteur in "Light 1"and Mark Total Kiss Up Hook Up Plumping Lip Gloss in "Sexy"
24. Display pretty fragrances on top of a cake stand.

25. Apply Vaseline on your pulse points before spraying your perfume to make the scent last longer.
Since the ointment is occlusive, it will hold the fragrance on your skin longer than if you were to spray the perfume just onto your skin

From:cosmopolitan
No comments :
Post a Comment